


Please note that I am not an authority on this stuff. I created this page to document some things I did so I would not forget. I do not mean to disrespect the many subject matter experts who have done so much for the community and know so much more than I do. Hopefully I have given credit and continue to give credit for other's work.
While I have good experience with the SDRPlay SDR Receivers and the SDRUno software this is my first experience with the Apache Labs ANAN 7000DLE MK-II Transceiver. I thought I would begin to chronicle my path to set up and explore the transceiver and software. There are several fine setup and installation videos and tutorials online. My presentation here is not meant to be comprehensive and exhaustive. I just wanted to document the places that slowed me down or required further investigation.
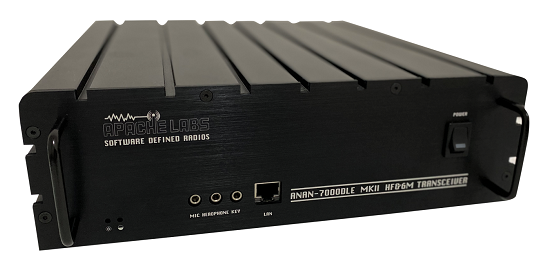
The picture above is the model I purchased in February 2020 with the black finish and without the internal computer. Here is the Technical Data Sheet from Apache Labs.
This is an AMAZING radio. If you are looking for a plug-and-play radio that will work out of the box this one is not for you. If you want to maximize the most enjoyment of this radio you will need an understanding of computers, networking, configuring software and updating firmware. If you are open to learning and willing to spend the time to learn it can be a very rewarding and fulfilling experience for you. Everything you learn will build upon your foundational understanding and make each next step easier. It doesn't take long to get this radio on the air. There are several preset profiles in the software you can use to get you started, If you are not comfortable around computers, networking, finding, loading and configuring software you will likely be frustrated.
The transceiver does not come with documentation or software in the box. Everything is available online but it is not all in one place or conveniently packaged. It's almost as though you have to already know why you want this radio and how you plan to learn how to use it before you buy it. It's worth the effort to learn it. I have heard complaints from some who ordered this radio expecting it to be plug and play out of the box. One particularly misunderstood requirement is that you will need a respectable computer and a gigabit ethernet connection between the radio and the PC. You can use a 100 megabit network but you won't be able to use the latest and most robust software.
| Apache Labs Website |
| Apache Labs Forum |
User Manuals
I found there are two useful user manuals for the 7000. One is for the 7000DLE MK-II (File 1027 with the MK-II in the filename.) This manual shows the chrome front panel with no front LEDs. It also appears the three jacks for Mic, Headphone and Key might be 1/4 inch phone jacks. The rear of this model shows the connections for the internal computer. The other manual is for the 7000DLE (File 1026 without the MK-II in the filename). This manual shows the blue front panel with the LED indicators and the 3.5mm jacks for Mic, Headphone and Key. This is the same layout as the black model that I purchased in 2020.
Here are the links for the two different 7000 User Manuals on the Apache Labs website. They are 60 pages long.
| 1026 ANAN 7000DLE User Guide (Oct 2017) |
| 1027 7000DLE MKII User Guide (Feb 2019) |
Front Panel LEDs
At the lower left of the front panel there are two LEDs. The left-most one with the Power Icon is the power LED. The one next to it with the Half-Moon Icon is the FPGA Heartbeat LED.
The manual for the 7000DLE MK-II (File 1027 with the MK-II in the filename) says about the Field Programmable Gate Array (FPGA) Heartbeat LED: Note: There is an FPGA “Heartbeat” LED located on the back of the Transceiver grill that will blink every second to indicate that the FPGA firmware is properly installed and active for communication with the LCD Panel microprocessor.
The other manual (File 1026 without the MK-II in the filename) says this LED is on the front panel. The transceiver with the LCD Display on the front has the FPGA Heartbeat LED on the back. The transceiver without the LCD Display has the FPGA Heartbeat LED on the front.
The LED blinks whenever the power is on to indicate the FPGA is alive and active. In case of something like a bad or failed firmware load the LED would stop flashing. Keep in mind the LED will flash in either position of the Bootloader Switch. The control software (PowerSDR, Thetis, SDR Console) will not connect to the radio if the switch is in the Bootloader position.
The other two LEDs on the front panel are in the Ethernet Jack. The left one indicates a connection with a solid light, The right one blinks with network activity,
Power Cable
The 7000 came with a power cable. It had a Powerpole connector on one end that fits the power jack on the transceiver. The other end of the cable was not terminated. I crimped two round terminal lugs at the end of the cable for connection to the terminal studs on my power supply.
Speaker Jacks
Caution! There are two 1/4 inch speaker jacks on the rear panel. These are TRS (stereo) jacks. The speaker output is not grounded. It is a two wire floating signal (bridged output) connected to the tip and the ring of the jack. Neither speaker wires are grounded! So connect your speakers to the tip and ring on the plug. Do not connect to the sleeve - the longer grounded connection. DO NOT USE A MONO (tip and sleeve) /4 INCH PLUG! The sleeve will short out half of the output channel and possibly destroy the audio amplifier chip.
On my 7000DLE MKII the L and R speaker jacks were not wired properly at the factory. The jacks were actually Left Channel only in parallel. I had to open the transceiver and swap the wire that was plugged into the Orion board J8 and moved it into J9. Now I have L and R speaker audio on the rear jacks. Here's the link to the post on the Apache Labs Forum:
ANAN-8000 - Rear speaker out L-R - apache-labs.com
There is a standard 3.5mm stereo headphone jack on the front panel. You can connect stereo headphones or powered stereo speakers here if desired.
Using the Virtual Audio Cable (VAC)
PowerSDR has a VAC feature that allows you to use a mic and speaker connected to the sound card of your computer. This is a nice feature. Your mic and speaker audio are handled over the ethernet connection between the radio and the computer. No extra audio cables!
Note that VAC1 applies to the first receiver. VAC2 applies to the second receiver. Each VAC can handle two virtual audio devices so VAC1 can handle sending speaker audio to the computer and receiving mic audio from the computer. The terms first receiver and second receiver actually refers to one of the two ADCs. The second receiver can only receive within the passband of the first receiver. It's most useful for diversity reception with two antennas.
The microphone control button (on/off), Mic Gain slider and Main Volume volume slider do not apply to a mic and speaker used through VAC.
cmASIO Enhancement to Thetis
Using cmASIO, you connct a USB "sound card" such as a Behringer U-Phoria to your PC. This will bypass the Codec chip in the Anan and do all audio processing with the sound card and the PC.
The ASIO-enabled ChannelMaster (cmASIO) is a high-performance feature targeted for ‘power users’ wishing to permanently sink/source their speaker/microphone audio streams via an ASIO sound device attached to the host SDR computer, when operating phone or CW. When implemented by the user, all audio streams normally processed by the audio codec chip in the radio are thereafter processed by the ASIO device instead. Under these conditions, VAC1 & VAC2 may then be dedicated to digital-mode operations without the worry of having to frequently switch back and forth to phone or CW.
Here is a copy of the cmASIO Guide PDF File file that can be found in the Thetis folder C:\Program Files\OpenHPSDR\Thetis\cmASIO Guide.pdf
Setting Up the Audio Chain with CFC Audio Tools
Rob, W1AEX has a great tutorial on Set-Up Guide with CFC Audio Tools located at his web site here. You will need to spend some time going through these settings. It will help you achieve amazing transmit audio quality.
Setting or changing the IP Address / Updating Firmware
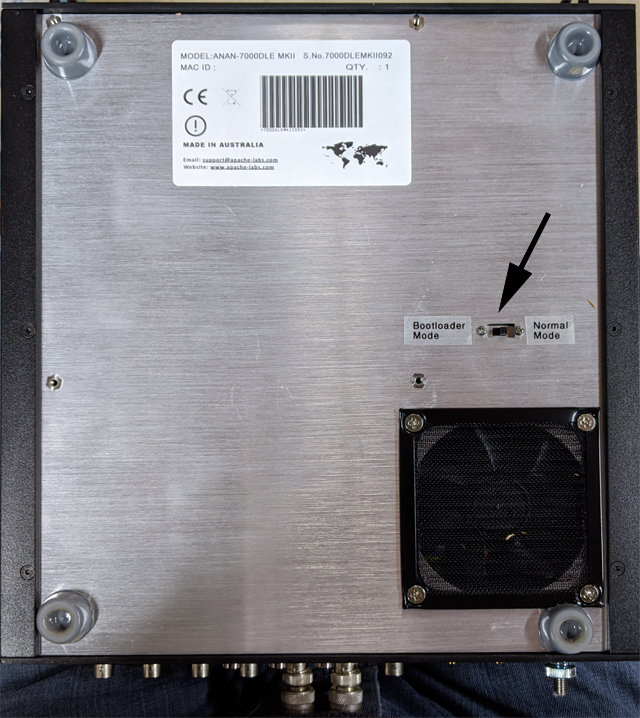
There is a bootloader slide switch at the bottom underside of the transceiver. It is not marked. I placed two labels at this switch to indicate the mode. On my radio the bootloader mode is invoked when the switch is moved to the center of the radio. Normal mode is with the switch towards the outside edge of the radio. You would need to move this switch to the bootloader mode to change things like the IP address or to load firmware. I have read in the forums that this switch may be installed either way at the factory. You should determine the positions for your particular radio and label the switch to avoid confusion later.
If for some reason the transceiver is "not found" by a previously working control software such as PowerSDR or Thetis you should check the position of the bootloader switch. It's easy for this switch to change position if you moved the radio. The control software will not run with the switch in the bootloader position. The FPGA LED will flash normally with the switch in either position with valid firmware loaded.
Protocol 1 or Protocol 2
What's the difference?
- Protocol 1 uses a 100BaseT network connection.
PowerSDR Radio Control Software uses Protocol 1 firmware and was designed to work with the slower 100BaseT connection and supports all the models of ANAN Transceivers. - Protocol 2 uses a 1000BaseT (1gE) network connection. The amount of data being transferred between the radio and PC exceeds the capacity of a 100BaseT connection.
Thetis Radio Control Software is more advanced than PowerSDR. The older versions required the faster 1000BaseT network. Not all ANAN radios can run Protocol 2 reliably if at all, especially the older ones. It depends on the FPGA chip on the board. The later versions of Thetis support either protocol automatically. The older ANANs still may not be able to run Thetis under Protocol 2 but with the later versions of Thetis they can now run Thetis under Protocol 1. - To switch protocols you need to flash the appropriate firmware to the transceiver. The transceiver does not support both protocols at the same time.
Protocol 2 is explained here on the Apache Forum
Rob, W1AEX has an excellent tutorial on setting up the ANAN network connection.
ANAN 7000DLE and 8000DLE Firmware
Protocol 1 v2.6 Firmware from Apache Labs
Protocol 1 v2.7 Firmware from GitHub
Protocol 2 v2.7.0 Firmware from the Apache Labs Forum
Firmware fix for RF appearing on RX only ports
The latest firmware can be found here. It fixes an important problem with RF appearing briefly on RX ports. Various versions 2.2.1, 2.2.2, and 2.2.3 are shown. Check the version of your FPGA before loading to ensure you have the correct version for your radio.
The Bootloader program seems to require the word "Metis" somewhere in the filename of the firmware or it can't be selected.
You should consider migrating to Protocol 2 firmware if your radio, network and computer can handle it. A comprehensive list of firmware is on the forum Here. New Protocol 2 firmware versions are available for the variants of the FPGA found in the Anan radios.
Radio Control Software
PowerSDR is the older software that was most popular in the past. Many still use this.
PowerSDR (Radio Control Software for Protocol 1) Downloads from the TAPR/OpenHPSDR GitHub site
PowerSDR mRX PS version 3.4.9 is the latest version with a Windows MSI installation file.
Thetis is the newer software and is more robust and richly featured.
Thetis updates happen very frequently. Latest Release of Thetis on GitHub
The latest versions of Thetis now natively support both Protocol 1 and Protocol 2.
The latest versions only run on 64 Bit Windows systems.
SDR Console is another fine software program to control the ANAN SDR. It requires Protocol 2 firmware.
Some important links
The entire archive of Orion MK-II Protocol 1 Firmware on GitHub
Latest Orion MK-II Protocol 1 Firmware on GitHub
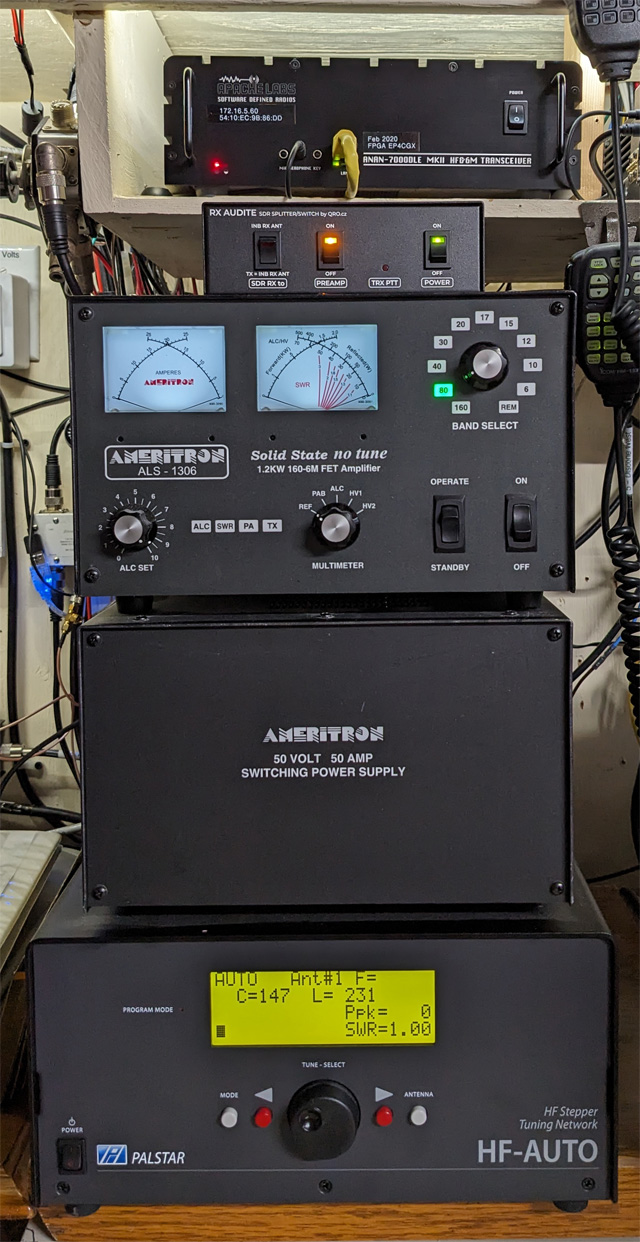
Here's the ANAN on the top shelf. Just below it is the RX Audite. It is an Antenna Switch that allows the Anan and my other SDR receivers to share the ham radio antenna and protects all the receivers when the antenna is used for transmitting. Below the RX Audite is the the Ameritron ALS-1306 solid-state amplifier. Finally at the bottom is the Palstar HF-Auto antenna tuner. Check out my Review of the RX Audite SDR Switch.
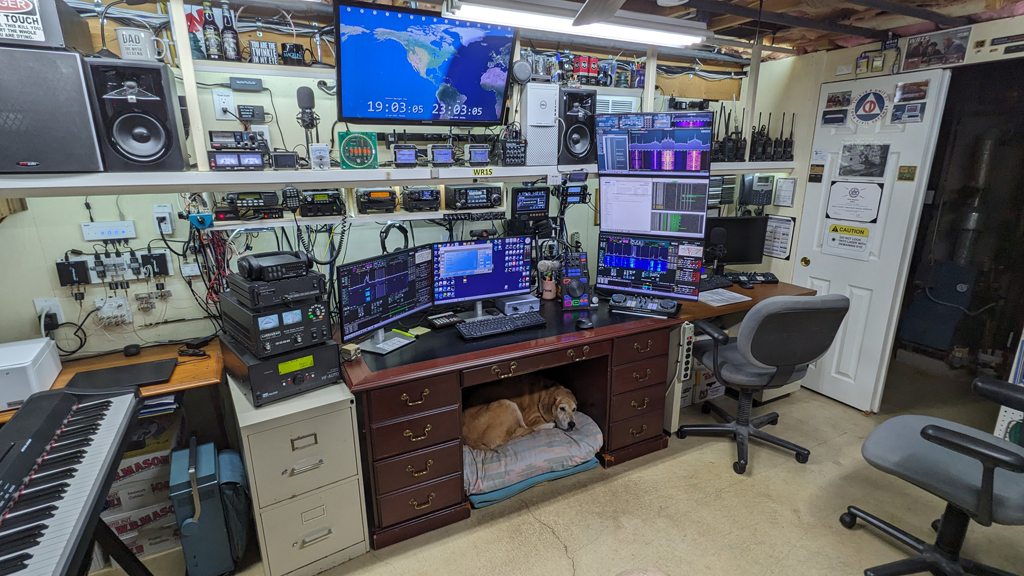
This is what the shack looks like today. That's my rescue dog, Gracie, under the desk.